Planning - The User Interface - Properties dialog - Project Properties dialogThe general section |


|
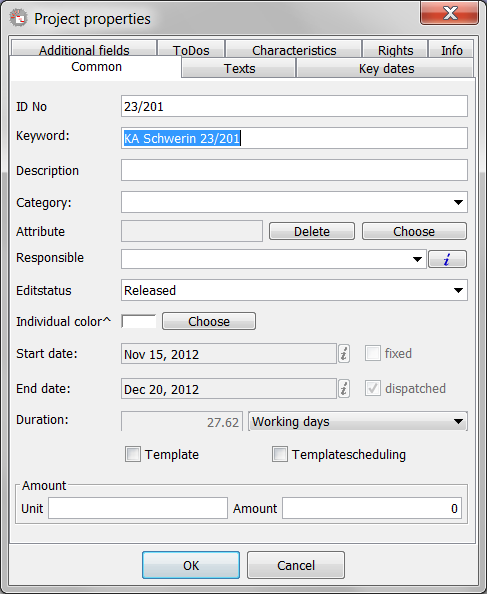
In the general section you will find the most important data of the project. When you create a new project, the least you have to enter is the keyword for the project. All other fields are either optional or already filled with default values.

The general section
The fields and options in the individual have the following meanings.
ID number |
This is one of you freely forgiving identification. She is saved together with the project and is optional, so to say no longer necessary. You can enter the desired text (up to 20 characters). (optional) |
Keyword |
Here, the name (up to 20 characters) of the project must be entered. This is used in PLANOUT to almost all displays and collections of the project. |
Description |
That's the equivalent of name (long) of a process at the project level. Here you can enter more detailed description (up to 40 characters) of your project. (optional). |
Category |
With this selection you are able to categorize your transactions. You can either type in a new category, or choose from the already entered one. |
Attribute |
Using the "Select" button next to the text box you can open a file selection dialog where you can select a small image file to your project particularly marked. After selecting, in the text box, the file name is displayed. The file should lie only in the directory "pics" in the <%% APP_NAME> in the application directory. The display is then in the project table, if you can show the column "ID". You can remove the "Delete" button of the indicator means. (optional). |
Responsible |
In any <%% APP_NAME> - project a responsible PLANOUT user is registered. This entry helps in assigning the project in larger plans. By default, this is always the currently logged on user. You can either a command, the small arrow button to expand the selection as well as the "i" - Change button. |
Management Status |
The administrative status can be set independently of the processing status of the project. With this option, you can access the project for certain PLANOUT - control user groups. To do this, in the Permissions section of the project properties, the corresponding PLANOUT - added user group permissions are set in the user manager and here only displayed. |
Edit status |
Here you can set the status of the entire project. This status is used in the search project of the project selection dialog. |
Individual color |
On the "Select" button to open a color selection dialog. Here you can freely choose any color you want to use for the process representation in the view with individual colors. Also you can set in the options, if the custom color to be displayed in the Project Table ("Custom View. Color Table" options, the "Advanced Settings", select the "View Settings" option). (optional) |
Start date |
The indication you see here, can not be changed in this dialog directly. The start time is based on the present operations and adjusts automatically. |
Selection: fixed |
Also this statement can not be changed in this dialog. But you can see from the selection option if the project is fixed. A fixed project can not be moved, or it must first be confirmed (adjustable in the options). If you want to fix a project, you can do this via the context menu. |
End date |
The end date is, as well as the start date, determined automatically from the operations.. |
Selection: diapatched |
This option indicates whether the project is loaded. Only loaded operations also trigger stress on the resources that are planned for them. This option is therefore not really logically arranged properly in the project because only the individual activities of the project are important (a project directly, no resources are assigned). However, one can make in PLANOUT from the context menu of the project this setting for the entire project. The corresponding menu item is "project is overloaded", depending on its status by clicking on it, all operations of the project are on or busy. |
Duration |
This option also can not be altered in projects, because it is calculated from the start and end time, in conjunction with the system calendar. The selection at the right allows you to change the unit of display, if you want. |
Selection: template |
If this option is enabled the project is saved as a template. You should create templates for such operations that you perform constantly again. With templates you can quickly create new projects and only need to enter project-specific data. |
Amount |
Here you can enter a unit and the number that determines an amount that you want to edit this project. This is especially useful if you set the tasks in the project so that it with the amounts from the parent process (here the project) work. In this case, you can change the quantity central here, you want to edit the project. |